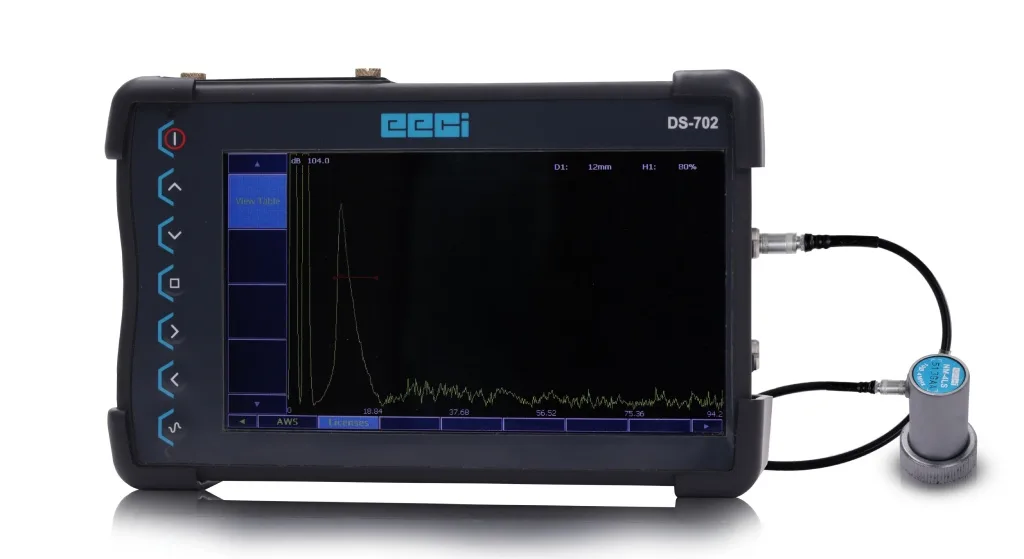
In this blog, we explore applications and the fundamental principles that make it an indispensable tool for quality control and safety assurance.
Understanding the Basics of Ultrasonic Inspection:
At its core, manual ultrasonic inspection involves the transmission of high-frequency sound waves into a material and the interpretation of the echoes or reflections that result.
These sound waves travel through the material, and when they encounter a boundary or defect, some of the energy is reflected back to the transducer.
By analyzing the time it takes for the sound waves to return and the amplitude of the reflections, an inspector can gain valuable insights into the material’s condition.
The Equipment
To conduct manual ultrasonic inspections, specialized equipment is required. This includes an ultrasonic flaw detector (UFD) and a transducer – which serves as both a sound wave emitter and receiver.
The transducer is typically moved by the inspector across the material’s surface. A coupling medium, often a gel or oil, is used to ensure proper sound wave transmission between the transducer and the material being inspected.
Applications
Manual ultrasonic inspection is applied in various industries, including:
- Weld Inspection: In manufacturing and construction, welds are critical to structural integrity. It can identify welding defects like porosity, lack of fusion, and cracks.
- Aerospace: The aviation and aerospace industries rely on this method to detect subsurface defects in aircraft components, ensuring passenger safety and equipment reliability.
- Oil and Gas: Pipelines and pressure vessels are subject to rigorous inspection to prevent leaks and catastrophic failures. Manual ultrasonic inspection helps in identifying corrosion, erosion, and other defects.
- Power Generation: In power plants, the integrity of critical components like turbine blades and boilers is assessed using manual ultrasonic inspection to ensure operational safety.
The Inspection Process
The manual ultrasonic inspection process can be summarized in a few key steps:
- Calibration: The transducer and UFD are calibrated by adjusting their settings to match the material’s characteristics, thickness, and sound velocity.
- Coupling: A coupling medium is applied to the material’s surface to improve sound wave transmission.
- Scanning: The transducer is moved across the material, and sound waves are emitted. The inspector monitors the display for echoes and reflections.
- Analysis: Echoes and reflections are carefully analyzed. The time between sound emission and reception provides information on the depth of a defect, while the amplitude and shape of the reflections help identify the defect’s nature.
- Reporting: The inspector documents the findings and provides a report detailing the material’s condition, any identified defects, and their significance.
Challenges and Advantages
Manual ultrasonic inspection is a versatile and reliable NDT technique, but it comes with some challenges. Skilled personnel are required for accurate results, and it may not be suitable for certain geometries or materials.
However, its advantages, including the ability to detect subsurface defects, its non-destructive nature, and its precision in thickness measurement, make it a valuable tool for quality assurance and safety.
Conclusion
Manual ultrasonic inspection is a crucial method in the arsenal of non-destructive testing techniques. It plays a pivotal role in ensuring the safety and reliability of critical structures and components across diverse industries. With ongoing advancements in technology, it continues to evolve, providing ever more accurate and efficient results.
As we continue to depend on advanced materials and complex structures, manual ultrasonic inspection will remain a cornerstone of quality control and safety assurance.
Recommendations:
- DIGISCAN DS-702 Ultrasonic Flaw Detector: The DIGISCAN DS-702 is a cutting-edge ultrasonic flaw detector, renowned for its precision in non-destructive testing. With advanced features like a high-resolution touchscreen, comprehensive data analysis tools, and a compact design, it is the go-to choice for professionals in various industries, ensuring efficient and accurate flaw detection.
- Ultrasonic transducers: Transducers are manufactured in sub-miniature, miniature, normal & large crystal size, to suit the component shape & test requirements. A wide range of frequencies & sizes of crystal is available.
Special custom-designed transducers are also manufactured to suit specific test requirements, with modified case designs, connectors, special wedges, etc
- Ultrasonic Reference Blocks: Various high-accuracy reference blocks are required to calibrate the UFD and the transducers
- Couplants :
For more information on various manual UT inspection solutions & training on Ultrasonic NDT testing, please contact our sales team

